DIY: Youtube Streaming Music Player
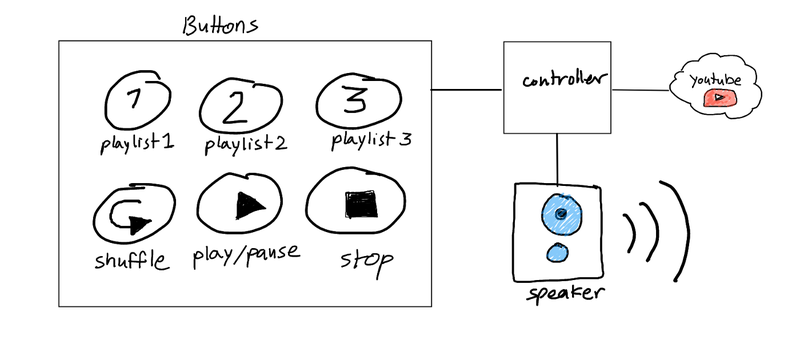
Here’s what we’re going to get.
I’ll continue on this post from my previous article about push buttons, so the button panel is ready.Other needed tools would be:a Raspberry Pi, any model would do. and connected with internet.a Debian based OS (I used the latest Raspian)wires with female headers to connect to the Pia power adapter able to provide for 2 Amps or above (my speakers are USB powered)an AUX cable
Interfacing The Buttons Panel
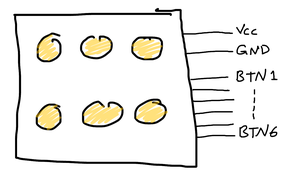
From a previous post, I managed to design a buttons panel, each button is connected to it’s own button debouching circuit, removing a lot of the noise produced from tactile buttons when pressed.To connect this panel to our Raspberry Pi, the interfacing is really simple:Vcc and GND for powerBTN1, through BTN6 each connect to an input pin in the Raspberry Pi headers.
The Software
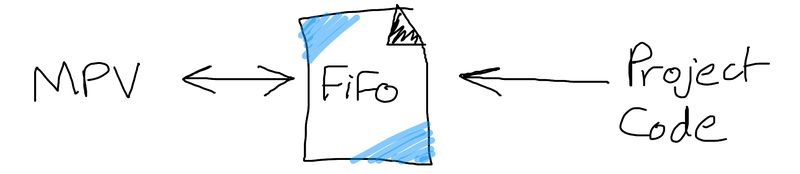
The skeleton of this code is continued from the Running Asynchronous Jobs with Push Buttons article.First you need to make sure that the youtube-dl program is updated (youtube-dl comes preinstalled on Raspian)I chose to use the MPV player (installed by default on Raspian). since it’s very lightweight and has a really simple command line interface.It is possible to send commands to MPV using Linux FIFO files (you’ll see how I did this in the code).
I’ll use python on this project as a mere personal preference, but you can choose another language however. From a software design perspective, what i did is really simple:Pressing Buttons 1, 2 or 3 will choose to play Playlists 1, 2 and 3 respectively. Pressing Buttons 1, 2 or 3, while music is on will stop playing.Button 4: will force to shuffle to the next song.Button 5: will cycle play and pause statesButton 6 is not used I’ll go through the code and explain what I did step by step, so let’s get going:first we import the needed modules:import RPi.GPIO as GPIO import time import subprocess import signal import os import errnoThen set the Raspberry to disable warnings and use the BCM GPIO modeGPIO.setwarnings(False) GPIO.setmode(GPIO.BCM)I assigned each button to a pin number on the Raspberry Pi which will be physically connected to:BTN_1 = 18 BTN_2 = 17 BTN_3 = 27 BTN_4 = 23 BTN_5 = 22This sets some variables used throughout the code, the actual playlist paths, shuffle and video modes:FIFO_FILE_PATH = “/home/pi/Desktop/fifo” YOUTUBE_PLAYLIST_1_URL = “https://www.youtube.com/playlist?list=xxxxxxxxxxxxxx" # Playlist 1YOUTUBE_PLAYLIST_2_URL = “https://www.youtube.com/playlist?list=xxxxxxxxxxxxxx" # Playlist 2YOUTUBE_PLAYLIST_3_URL = “https://www.youtube.com/playlist?list=xxxxxxxxxxxxxx" # Playlist 3 ENABLE_VIDEO = FalseENABLE_SHUFFLE = True LOG_FILE_PATH = “/home/pi/Desktop/log.txt”Set the actual input pins for the Raspberry Pi:# inputs GPIO.setup(BTN_1, GPIO.IN) GPIO.setup(BTN_2, GPIO.IN) GPIO.setup(BTN_3, GPIO.IN) GPIO.setup(BTN_4, GPIO.IN) GPIO.setup(BTN_5, GPIO.IN) GPIO.setup(BTN_6, GPIO.IN)Setup the FIFO file for communicating with MPV, the silentremove() method will remove the fifo file if it already exists from a past execution of the program.silentremove(FIFO_FILE_PATH) subprocess.Popen(["mkfifo", FIFO_FILE_PATH])The get_mpv_run_command() method will construct the linux run command that will run MPV from console with proper parameters:And the exec_playlist() method will run MPV using the output from get_mpv_run_command() method. it takes the playlist path to tell MPV to stream.First 3 buttons are hooked to callbacks that basically will execute exec_playlist() on either playlists.Buttons 4 and 5 are hooked to callbacks that will write play/pause and shuffle commads respectively to the FIFO file that MPV reads. you can see the full list of supported MPV commands from here.At last, since the system depends on software interrupts (callback methods), in the main program we just loop forever and stop at keyboard interrupts (Ctrl+C), stopping MPV process.From all this we get out with a single python module (call it main.py). The complete code is hosted on github, click here to view it.
Deployment
We need to make sure that our program runs at system startup so we don’t have to manually run it whenever the Pi is restarted for some reason.This can be done using linux Cron Jobs or simply using .desktop files which I'll be using here. so follow on:Create a directory called ~/.config/autostart with mkdir /home/pi/.config/autostart.Create a new file in that directory and edit it with nano /home/pi/.config/autostart/main.py.desktopWrite the following, note that Exec is set to the run command of the project:[Desktop Entry] Type=Application Exec=/usr/bin/python /home/pi/main.pyexit with Ctrl+X, and type Y to save your changes.That's it, now our program will run at every startup.
Things worth mentioning
At first I connected the AUX cable from the speakers to the raspberry pi’s 3.5 head jack, there was a noticeable noise with the sound. I tried another player (VLC) and updated the drivers but could not get rid of the noise. I solved this issue by using an external USB audio driver to get a decent sound quality.I used simple tactile push buttons for the buttons panel, and to get rid of noise I used both hardware debouncing (using RC circuits and Schmitt Trigger gates) and software debouncing techniques, in the code I used a bounce time of 100 milliseconds, but you can play with if you used different buttons.For the YouTube playlists, you need to make sure that they are public playlists so that MPV can see them. there’s also an option in the owner YouTube account’s settings to change the privacy.
Conclusion
This project is one way to Utilize buttons to control whatever you want, the project can be easily customized and you can use it however you like. If you have any problems reading this, or there’s some missing pieces. you can contact me at [email protected], I’ll get back to you right away.