Git for Developers: Part 3
The concept of remote repositories is that there is a remote server and we take our changes and put them on the remote server so that people or contributors can see the changes and make use of them.
The only difference between repositories locally on your computer or on a publicly available server is that other users can see the repository that is on the server. There are many websites that can host your repository files and give you a public URI and Shell access, this will make a copy of your repository on an online server that other interested people can access.
Example websites include, GitHub, Gitlab and bitbucket and more. We’ll be using github, but they’re all somehow similar.
First, you have to understand some things, take a look at the following diagram:
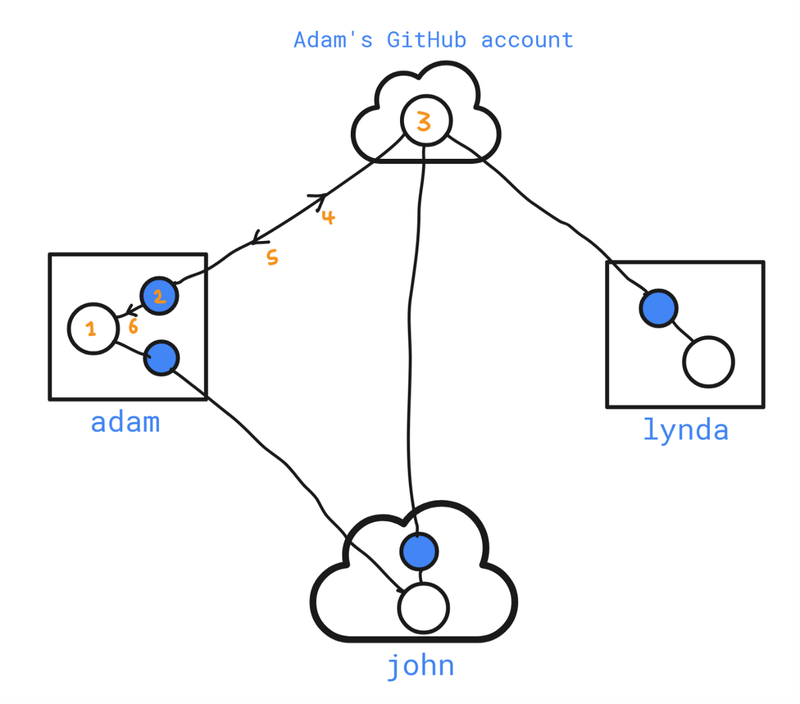
From looking at the shapes:
- square shape is your local computer, without a public IP.
- Cloud shape is a computer on the internet, that everyone can see.
- Empty circles are the git repositories, and they have the three trees (working, staging and repository trees) mentioned before.
- Filled circles are mirrors of the remote repository it’s connected to.
- Lines are called Remotes; they refer to repositories on different places.
And from looking at the numbers:
- Is Adam’s local repository that he’s working on, and stored locally on his computer.
- Is a mirror of the repository marked with no. 3, when Adam makes a fetch, it is updated with all commits from the repository no.3, which may have other changes from other contributors.
- Is a remote repository to Adam. It is stored on a github account (Adam’s account) and is publically accessible (readable) from other users.
- Is called pushing, when Adam makes some local commits, he then pushes (uploads) them to the remote repository on his github account, so that Lynda and john can see the changes.
- Is called fetching, this downloads changes on the github repository (possibly made by Lynda or john) to Adam’s local mirror.
- Merging, if Adam wants to apply the changes he just downloaded from the remote repository (that reside in the mirror), to his local repository.
Some notes and clarifications:
- remember that the github repository is just a normal git repo (git is distributed software), although we use it as kind of a central repo.
- Adams local repository and remote one are completely separate git repositories.
- John and Lynda are called contributes to the project, since Adam made the repo public, Lynda can copy (clone) the project to her local computer and continue working from there.
- It is possible to define more than one remote between repositories, since john’s computer is publically accessible, Adam can point to his repository and fetch changes from there.
Note: I’ll be referring to the word “repository” as “repo” from now on.
Pushing, fetching and merging
by pushing we copy the commits from our local repo to the remote repo, at the same time, git also makes another branch on our local computer that is typically called origin/branch_name, origin is the name of the remote, demonstrated as the line in the previous diagram. And branch_name is the branch on the local mirror this branch references the remote branch and always tries to be synced with it.
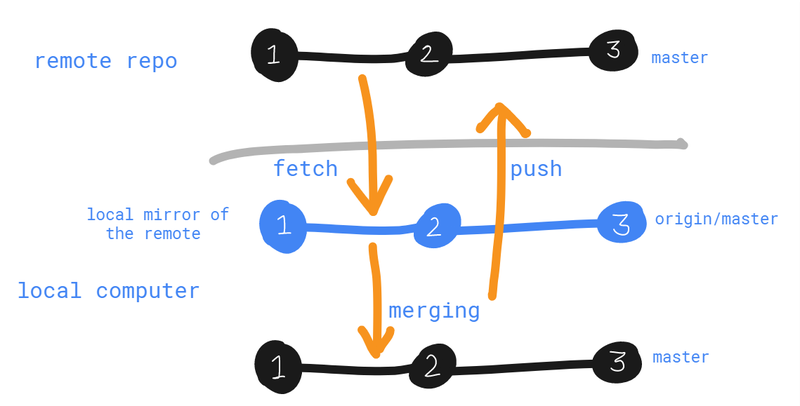
Hence: origin is the name of the remote reference pointing to the remote repo (it can have a custom name). Remotes are defined in the local .git folder and refer to branches in the local mirror, which has its own tree of commits cloned from the remote (github) repo.
The local repository and local remote mirror are not actually that separate, you will see that the commit nodes are note really duplicated, however the branch pointers have different values.
by fetching changes from the remote, changes by contributors come to our local origin/master branch (in the mirror). we’re essentially saying sync up my origin/master with the remote server version but it does not bring it to our master branch until we make a merge.
the above illustration is just to make things clear, it is not like that with all those commits duplicated, see below:
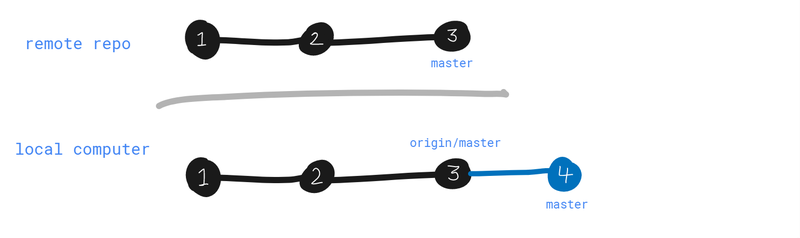
Now let’s follow some real example of pushing fetching and merging with remotes. We’ll start with the following states for the local and remote repositories:
If we now make local changes on our repo (like all the things we did before), and then commit the changes creating a new commit node, this will move the master branch to point to the new commit (HEAD will have a new value). But the remote\master branch (the local clone of the remote tree) won’t be changed. Look below:
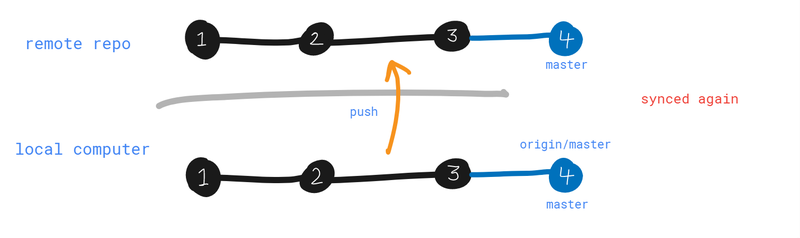
Now we want to put the change we made to Adam’s github repo, so we make a push. What push will do is that it will:
- merge the origin/master branch into the master branch (fast forward in this case)
- sync the origin/master with the remote repo master branch (uploading…)
sometimes the remote might be already updated with more commits from another source (like Lynda or john!). in this case git will notify us before pushing. And we will have to first fetch those changes and apply them to our local repo and then upload changes we made. More on this later.
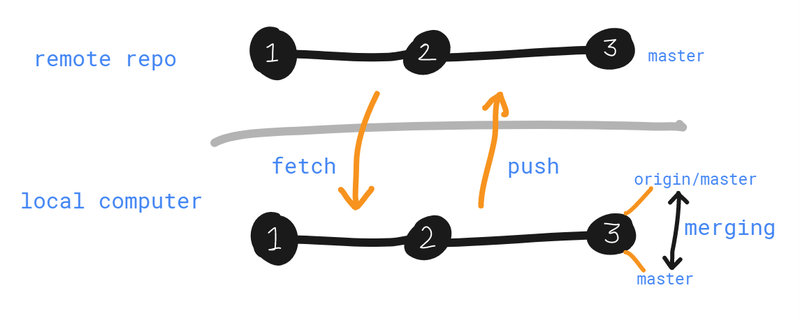
Next, the remote repository was added a new commit (commit 5), this commit may be added by a push from another user on the network (maybe john or Lynda).
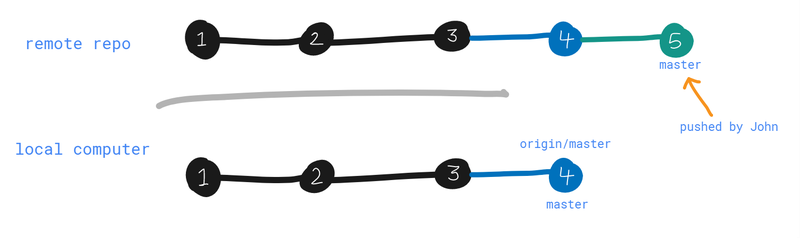
We make a fetch to get that change to our local repo, the origin/master is updated. but the master is kept the same, like so:
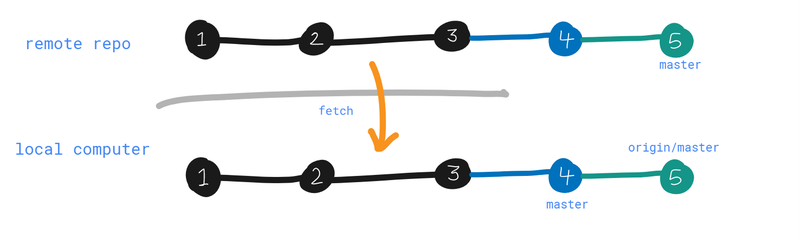
And to apply the changes to the local repo, we do a simple fast forward merge:
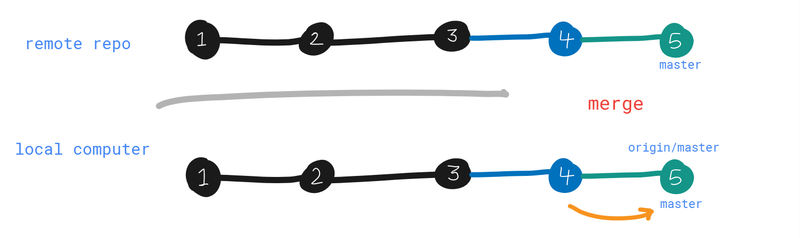
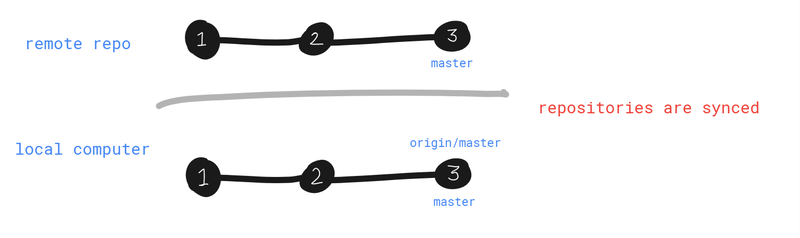
And finally the local repo is synced with the remote again. notice that the origin/master is just a branch but the only difference is that it always tries to stay in sync with what’s on the remote server.
Connecting with a github repo
To create a connection (the remote) from Adam’s repo to GitHub’s repo, run git remote add [remote name, usually “origin”] [repo URI], to show all of your remote connections, run git remote, and to remove a remote, run git remote rm [remote name].
To push a branch (master) to a remote repo (with remote connection “origin” already defined):
git push -u origin master. (it asks for github username and pass)
.git/config has the new remote UIR for the branch and in the remotes section and .git/refs/remotes/origin has all of the “origin” remote branches.
git branch -r shows the remote branches (in the local mirror), and git branch -a shows both the local and remote branches.
Cloning a remote repository
So we decided to collaborate on an open source project, let’s assume that we are one of the collaborators, the github repository is already there and we have the URI.
Locally we don’t have anything about the project (we don’t have a local repo). So we start form copying or cloning the remote repository first.
to get a clone of the remote repo, got to a directory that is not a git repo, then type git clone [remote repo URI] [(optional) a name for the directory other than the default repo name].
note: by default, the master branch is the one that is pulled locally, but you can specify which one.
This will create a new directory with the remote repo name, and inside is a git repository (local copy), that you can start working on, by creating new commits and pushing them.
Tracking remote branches
We mentioned tracking before as a good practice when working on feature branches, we merge the master (or the originating) branch to get latest commits (that may be created by other contributors). This reduces chances of merge conflicts at the end, when the feature branch is complete and finally merged back into master.
When working with remotes, the local master branch is setup to track the origin/master branch, this means that whenever you make a push the origin/master is always updated with the master branch and uploaded to the remote server. This happens automatically when you clone a repository.
However, when you create a new branch new_feature locally, it is not setup to track anything on the remote origin, this means if you want to upload that branch to the github repo with a push, and since your branch new_feature is not tracked with any branch on the local mirror, like origin/new_feauture, all commits on the branch won’t be pushed.
You can setup the new branch new_feature to be tracked in one of three ways:
- add settings for the new_feature branch in .git/config just like settings for the master branch:
[branch “master”] Remote = origin (this says the master tracks origin/master) Merge = refs/heads/master
Just do the same for new_feature
- using the git config command:
git config branch.new_feature.remote origin (or whatever the remote name is) git config branch.new_feature.merge refs/heads/mastergit branch –set-upstream new_feature origin/new_feature
this will make another branch called origin/new_feature that will track new_feature and pushed to the remote repo as well.
- Do it when you first push:
Git push –u (same as –set-upstream) origin new_feature
Some important notes:
- Remote branches are treated just like a normal branch, for example, to compare master with origin/master:
git diff origin/master..master. you can do this after making a local commit and before pushing. - The defined remotes (like origin) are only synced with the remote repository (another computer) when you make a fetch.
- when we do a fetch we need internet connection to download the latest remote changes to the local origin/master.
- you can do just
git fetch, orgit pushif you only have one remote repo (we only have origin), and the target branch is the master branch - fetch does not affect the working directory, and if we made some commits, those are not affected also after doing a fetch. A fetch is not harmful at all.
Some guidelines on fetching
- always fetch before you work. first thing in the morning.
- fetch before you push.
- fetch often (before losing the internet connection or before going out to work at the part with your dog)
merging after a fetch
After fetching from the remote repo, and seeing the difference between the local branch, “master” for instance and the remote branch (in the local mirror) for example “origin/master”. After that we make a merge between the two, like so:
- make sure that you are on the correct local branch, the receiving branch (master for example).
- Do the merge with git merge origin/master.
- Resolve conflicts if they arise.
Note: git doesn’t allow us to checkout to a remote branch (select it), git is responsible of managing this branch.
There is a handy shortcut that combines both fetch and merge commands:
git pull = git fetch + git merge between local and remote branches.
git pull is very convenient, but harder if errors arise, and often people misunderstand it and not knowing that it's a fetch and a merge, so you have to be careful about this.
New branches form remotes
If we’re working as Adam again, and let’s assume that Lynda created a new branch lyndas_branch with some commits and pushed the changes to the Adam’s github repository. Now Adam fetches the changes and Adam’s remote is synced with the github repository. A new branch is added to Adam’s remote and is called origin/lyndas_branch. This branch is not yet on the local repository of Adam and we can’t merge this branch to anything because Adam’s repo doesn’t contain a branch called lyndas_branch. Adam has to create this branch manually and track it with origin/lyndas_branch:
In two steps:
Git branch lyndas_branch origin/lyndas_branch Git checkout lyndas_branch
Or with one step:
Git checkout –b(to create the branch) lyndas_branch origin/lyndas_branch(setup tracking). This will switch to the new branch automatically.
let’s say you are writing on the master branch and now you are ready to push to the remote server, so you have new local commits and there were also new commits added after you did your last fetch (by some other contribute), when you try to push git will refuse to push and will say that there are new changes to the remote repo that you haven’t fetched and I don’t know what to do.
The solution is to fetch then merge the new changes locally and then try and push again.
Deleting a remote branch
Adam wants to tell github to delete one of the branches on GitHub’s repository.
There are two ways, the old way and a new way:
old way (not intuitive)
using a colon: git push origin :branchX. this however does not delete the local branchX branch
new way
using: git push origin --delete branchX, this will remove the remote branch origin/branchX and the local branch, and will remove it from the github repository.
Git Collaboration
I will demonstrate collaboration using github. The same works also for other services like gitlab and bitbucket and others.
You can create an account on github, they will give you a place to put your project git repositories so that it is available on a place where other collaborators can reach.
You can set access limits to your github repo:
- Public: open source, users can see your code from the URI, and everyone can clone your repo to their local computers and work from there. They don’t have write access however, it’s up to you (the owner of the repo) to give write access to some collaborators so that they can push their changes to the github repo.
- Private: the github repo is private, and only a group of people you assign can read and clone the repo.
If you have a github repo of some project you’re interested in collaborating to, then you can clone this repo and add your own changes. However, you don’t have write access to the repo and you can’t push right away, in this case you make something called a “push request” to the owner of the repo, then the owner can then decide to accept the push and merge the changes to his github repo.
Github forking
forking a repo makes your own copy of the project on your own github repository which you will have write access to, then you make changes to that and at the end when you finish implementing your ideas, you issue a pull request on the original github repository. you create a pull request with a message stating what you did, and then they decide whether to incorporate the things you did to their repo and maybe accept your changes and incorporate them into the main project. they’ll grab your branch and merge it in. and at that point everyone will have access to your new feature.
A collaboration workflow: Joe and Lynda.
As a recap for git collaboration and with github, let’s follow up with this story between Lynda and Joe. Both already defined the remotes and has read/write access to the repository at github.
From Joe’s point of view
Joe wants to contribute to a project created by Lynda by adding a feature to her project, so he does the following:
- git checkout master
- git fetch — in the morning
- git merge origin/master (or git pull instead of 2 and 3)
- now Joe creates a new branch for the new feature (best practice: because if he canceled working on this feature, he can just throw this branch away)
- (master) git checkout -b feedback_form. This will check it out creating a new branch from the master (at this stage, the working directory is still the same as the master working directory). (master) at the beginning of the prompt is just to tell that master is the currently selected branch (HEAD is on master). After checkout, HEAD will be at feedback_form.
- now Joe codes his own feature and makes some number of commits. for example, creates a file called feedback.html
- git add feedback.html
- git commit -m “Add customer feedback form”
- now Joe wants to push his changes, but before that Joe will fetch again and merge any new changes to my repo.
- git push -u origin feedback_form
now Lynda can see my changes on the remote repo, so Joe send her an email to tell her hey see my changes.
From Lynda’s point of view
she does the following:
- git checkout master
- git fetch, now git branch -r shows the new branch Joe created.
- git merge origin/master
- now she checks out to the branch feedback_form with git checkout -b feedback_form origin/feedback_form, this will set tracking between Lynda’s new local feedback_form and the one from origin (that was pulled from github and originally pushed by Joe).
- she uses git log to see the commit that Joe made and maybe see that commit git show [Hash].
- she then realizes that something else should be added, she makes the change and commits it using the -a option, git commit -am “Add tour selector to feedback form”.
- then before pushing the changes, git fetch, then maybe merge if there are any other changes by other people.
- git push
now Lynda sends an email to Joe to inform about the change.
Back to Joe
- git fetch
- now joe wants to see what Lynda did, and compare between the local feedback_form and the origin feedback_form (what Lynda pushed up to the repository).
- git log -p feedback_form..origin/feedback_form
- Joe reads the changes and merge them into his local feedback_form with git merge origin/feedback_form (note that he selected feedback_form first — the receiver branch).
- Joe decided that the new feature is finished and the feedback_form is ready to be merged back into the master branch for production.
- so Joe switches back to the master branch (the receiver branch) with git checkout master.
- git fetch (to see any new changes that Lynda may have pushed), changes that may be for master also. If there are new changes to master, then git merge origin/master (just make sure that master is up to date before doing the next step).
- the next step is to do the merge from feedback_form to master, git merge feedback_form (or git merge origin/feedback_form since they both point to the exact same commit).
- git push
git aliases
if you’re using long git commands often, then you can create aliases or shortcuts with a custom name, much like Linux aliases. With the command git config:
git config –global alias.st “status”. (see ~/.gitconfig to see added configurations)
now git st is the shorthand for git status.
You can set the aliases in any of the three git config levels (project, global or system).
The following is a list of handy aliases I use very often, which will make working with git easier:
- co — checkout
- ci — commit
- br — branch
- df — diff
- dfs “diff — staged”
- logg — “log — graph — decorate — oneline — abbrev-commit — all”
just add them in the same way one by one, or just copy the following to your git config files:
[alias] st = status ci = commit br = branch co = checkout df = diff lg = log -p logg = log --graph --decorate --oneline --abbrev-commit –all