Git for Developers: Part 2
There are different aliases and symbols to refer to a commit in the repository tree. For example:
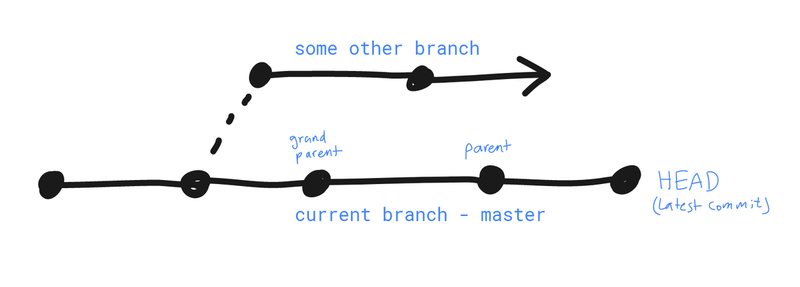
- the head commit, the latest:
HEAD, or it’s hashaf4564.., or the current branch name like:master - the parent commit:
HEAD^oraf4564^ - the grandparent:
HEAD^^ - the great grandparent:
HEAD^^^ - use
~with a number to get deeper:HEAD~3,HEAD~5…etc. (HEAD~1=HEAD^)
Browsing snapshots of commits
By referring to different commits using an alias of the commits hash, we can actually browse the project’s files at that time.
The following commands list the contents of a commit snapshot:
Note: tree means a directory, and blob means any file type.
git ls-tree HEAD: lists the files in the repo at that time.git ls-tree master assets/: lists the contents of assets directory in the master (same content as HEAD here)git ls-tree master^ assets/: lists the contents of assets directory in the master branch in the previous commitgit ls-tree 4c56f2: you can also refer to a very past commit with the hash (seegit log).
Getting more from the log
Remember that you can always get more information regarding any git command with git help [command], see the output of git help log for example.
Following are different variations of getting the commit log:
git log --oneline -3shows only three (shows part of the Hash)git log --[since/untill or both]="2012-05-05"git log --since="2 weeks ago" --until="3 days ago"git log --author="osama abuomar"(filter by user)git log --grep="temp"(to get commits with message containing “temp”)git log 45648fd..dsafd456 –oneline(to get a range of commits)- what has happened to the index.html file since that commit to the most recent commit:
git log cdfs32.. index.html - log with more details:
git log –p, patch option, shows the line additions and the deletions - log with statistics of what changed. this command does not show what was actually changed but it show a summary of the changes in the files. large +’s means a lot was added. Using:
git log --stat --summary
formatting the log
git log --format=oneline (same as git log --oneline but shows full Hash)
to draw a really cool graph, shows the branches, use git log --graph
Now, this shows a lot of things in a practical way (really handy), using: git log --oneline --graph --all –decorate. I have created a git alias for this command (I mention git aliases later on). Since this command string is really long, and really cool and handy. I created a custom command, git log2. Where:
git log2 = git log --oneline --graph --all –decorate.
Viewing commits
To examine a commit to see what was committed and what has changed in detail:
git show [Hash] (shows the differences).
You can format the output for a more compact view:
git show --format=oneline HEAD^
git show --format=oneline HEAD~3
to see contents of a file in a past commit (past state of the repository)
git show [Commit Hash]:[PATH]
for example, git show e4d1e94:.gitignore shows the content of the file .gitignore (the ignore file) on the commit e4d1e94.
And the following command shows all the files in a past commit: git show [Commit Hash]:.
Comparing commits
When comparing commits, we actually compare two directories or a group of files, by using the diff git command.
the git diff command can do a lot more than just comparing the working directory, staging index and the repository trees, take a look at the following examples:
git diff [Hash]: shows the difference between our working directory and the repo of the Hash commit.git diff [Hash] index.html: shows the difference between the index.html in the working directory and the index.html in the commit snapshot referred to by the hash.git diff hfdhsa..234hfds: compares all files (the whole project directory) between the two commit snapshots.git diff hfdhsa..234hfds index.html: same as last one, but only for the index.html file.git diff --stat -w hfdhsa..234hfds index.html: the–woption is used to ignore all white space changes, like adding an empty new line (which is not much important in most cases). The–statoption is used to output a more compact view to show changes only as a count of additions and deletions of lines, and which files are changed. Here’s a sample output:
$ git diff -w --stat HEAD^^..HEAD foo.txt | 6 ++++++ 1 file changed, 6 insertions(+)
Branching
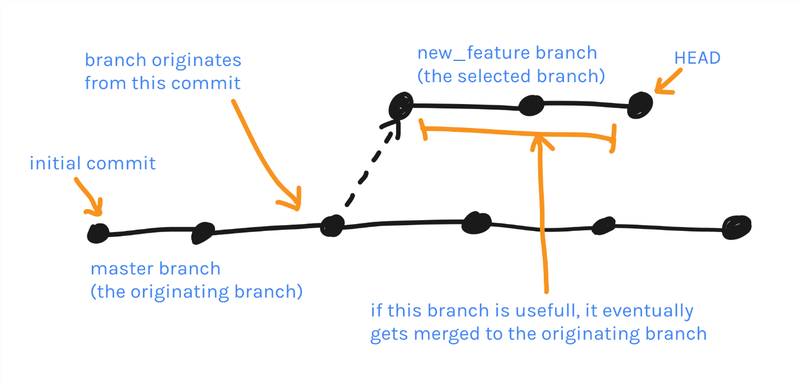
We previously talked about branches as they provide us a way to work within contexts. You can start a branch of commits from any commit node in the repository tree. branches are stored in .git/refs/heads/.
git branch shows a list of the branches we have on the repository; the current or selected branch will be marked for you in green. Always be aware of what branch you’re on before making a commit.
to create a new branch from starting from the HEAD commit node: git branch [branch_name], this only creates the branch and you have to switch to that branch to start working on it.
to switch to the new branch, run git checkout new_feature. now .git/HEAD points to the new branch.
Note that switching branches has live effect on the working directory.
You can create and switch to a branch at the same time using one command using the –b option:
git checkout -b(creating a new branch) fix_bug_x
note: when you create a new branch it is extended from the branch you are already on, so be sure to move to the branch before creating a new one.
Remember that HEAD always points to the last commit on the selected branch.
Branches with uncommitted changes
To switch between branches, the working directory must be clean (or mostly clean)
if you have unstaged and uncommitted changes in the working directory, switching branches will wipe all that out
in this case you have these options before switching branch:
- discard the changes
git checkout -- <file> - commit the changes.
- stash the changes (will get to stashing later on…)
you can create a branch starting from any commit node in the repository tree:
git checkout -b testing_something [Commit SHA (the branch starts from this commit)].
Comparing branches
Using the git diff command:
git diff master..new_feature, this compares the tip (last commit) of master with the tip of new_feature branches.
git diff master^..new_feature~3, you can also do that. Not that a branch name can also be used as an alias for the branch’s latest commit.
another way to compare branches by seeing which branch is included into another (merged)
git branch --merged shows the current branch, and other branches are included in the current green branch. Look at the following example:
$ git branch –merged Master New_feature * shorten_title
this means that all the commits in master and new_feature are also included in the shorten_title branch
renaming branches
to rename a branch, you have to move it to a new branch name using the –m option:
git branch -m(move) new_feature seo_title: this moves/renames the branch
deleting a branch
using the –d option:
git branch -d(or --delete) branch_to_delete
git makes the following checks before deleting a branch:
- you can’t delete a currently selected branch, you first have to select another branch.
- git will warn you if you try to delete a branch that has changes (commits) and is not merged yet, however to force the delete, use the
–Doption. - if the branch is empty and not the current one, git deletes it right away.
Branches normally end by being merged to the originating branch to make use of all the changes made by all the commits in that branch, but if you for example created a branch just to test some new feature and you changed your mind, you can always delete the branch.
Merging branches
When merging, first you need to switch to the receiver branch (the one that you want to merge into), with the command git checkout master. The do the merge with git merge new_feature. Take a look at this diagram:
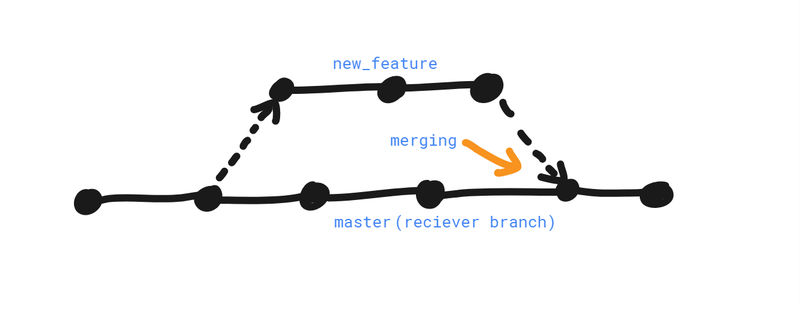
now there is no difference between both branches and git diff master..new_feature returns nothing (no difference), and now you can delete the new_feature branch.
Note: remember to have a clean working directory before merging
Fast forward vs real merges
Fast forward merging
Fast forward merging happens in cases like this:
In this case we want to merge branch_y into branch_x
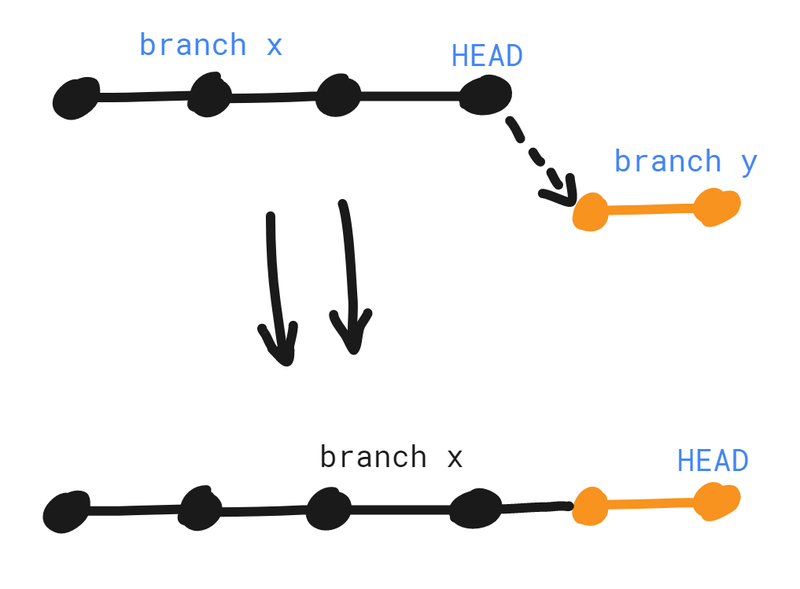
that is an easy merge. git looks at all the past commits in the chain of the branch_y branch and sees that it contains the HEAD of the branch_x (the receiving branch) and informs you that it is possible to do a simple fast forward merge like this. we don’t even need a new commit to do it.
you have the option to tell git to not use the fast forward way and create a new commit (just to make a record in the git log with a new messaged commit) using the option –no-ff: git merge --no-ff branch_name.
real or true merging
this always makes a new commit (at the meeting of the branches). git uses real merging if the receiver branch made new commits after from where the branch starts. HEAD of master is not an ancestor of the branch we want to merge. Look at this diagram again:

You make a real or true merge by the command: git merge new_feature.
Note: in most cases, git determines what way of merging to use.
Merging conflicts
Merging conflicts happen when there are two commits in two different branches having changes in the same line in a file.
For example, let’s assume there is a master branch with a number of commits. we now create a new branch and edit a file and commit, then switch to master and edit the same file at same lines and commit, after that we want to merge the new branch to master using git merge new_branch, this gives a merging conflict. It means that git can’t decide between both changes, what change to take in the creation of the new commit from the merging process?. And we need to resolve this manually.
Resolving merge conflicts
After trying to merge with git merge, and had a merge conflict, you are now in a new area (master|MERGING) between the branches and you need to resolve. The selected branch appears in the terminal as $(master|MERGING) instead of just $(master).
When git says you have a merge conflict, you have 3 choices:
- abort the merge
- resolve the conflicts manually
- use a merge tool
let’s get to each choice in detail.
abort the merge
git merge new_branch. (you start the merging process)
git says you have a conflict between branches.
Then you run: git merge –abort. (To cancel the merge)
resolve the conflicts manually
When conflicts arise after merging branches. If you inspect the file where the conflict happens, you will see some marks, added by git:
<<<<<<< Changes made in master (receiving branch) ======= (a separator) Changes made by the merged branch, new_feature >>>>>>>
Note: you have to choose one change and delete all the git marks.
then do the commit with git commit -m "..." (you can just say here without a message as there is a standard message for the merge commit). After committing the prompt will return to be at the receiving branch $(master).
using a merge tool
git mergetool --tool=”some_tool”. This opens a GUI tool to resolve the conflicts which is certainly easier.
In most cases you will be resolving conflicts in some IDE like Atom, Sublime, JetBrains IDEs and many others. They do this a lot easier form the UI context.
strategies to reduce merge conflicts
there are strategies and best practices you can take to reduce having merge conflicts in your code:
- when writing code, try to keep lines as short as you can.
- Keep commits small (have small changes) and focused to a specific thing.
- Don’t make unnecessary whitespace changes (extra spaces, new lines, tabs …etc.) in places that have no effect.
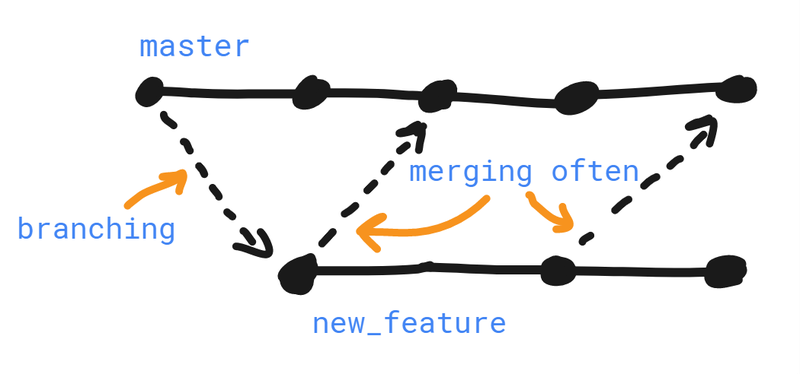
- Try to merge more often. the longer you wait to merge the more potential conflicts you’ll have.
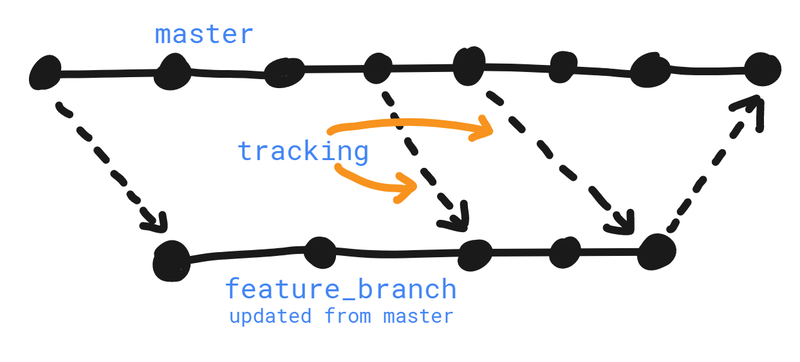
- track changes to master: if you are working in a branch other than the master it is better to keep updated with the master every once and a while to prevent drifting away, this is called tracking. Tracking is useful in cases where you are working on some feature_branch, and the master (the originating branch) has continuous changes and commits are added to it (for example by another user) while you’re working on your feature_branch.
Note: in a git repository, you can branch out of any branch, and merge to any branch. There are no rules regarding the source or destination.
Note: after merging a branch, the branch still exists if you haven’t deleted it. And you can continue working (adding more commits) on an already merged branch.
Stashing
The stash is a place where changes are saved temporarily without having to commit them. the stash is not part of the three trees we know in git, it is in a fourth area.
Changes we put in the stash are not commits but work in a very similar way, and they don’t have a Hash associated with them.
In most cases we use stashing when we are in a branch and make some changes to some file in the repository and now we want to checkout to master (another branch) without having a clean directory or making a commit. git will not switch to that branch unless we commit, discard or stash our changes, we are not ready for a commit yet so we stash the changes in a drawer.
Creating stashes
You can save all current changes with git stash save “message”, this will save all changes in both the working tree and the staging index, and will make the working directory clean.
listing stashes
You can show all stashes with the command git stash list, this shows all saved stashes and it doesn’t matter what branch is currently selected. Each stash is stored with a name (stash@{0}) and a description of the latest commit when the stash was created.
Sample output of the stash list:
stash@{0}: On master: 9cc0589... trying to fix a bug
stash@{1}: On feature_branch: 546123... updating styles
The git stash list command can take options for display just like the git log command.
For more details, you can show all changes made in a specific stash with the command git stash show –p(to show a patch display) stash@{0}(the stash name).
Retrieving stashed changes
This is like doing the opposite of git stash save.
retrieving the stash changes will apply the changes to the working directory no matter the current branch is, of course like doing merges, in this case there may be conflicts that you need to resolve
now the stash retrieving command is: git stash pop stash@{0} and git stash apply stash@{0}, both of these will pull what's in the stash out and put it in the working directory. the difference between those two is that pop will remove the stash from the stash area and the other won't.
after applying a stash, the working directory will have changes and won’t be clean, next you are supposed to continue the work and make a commit (or stash again!).
deleting items from the stash
to delete an entry in the stashing area whether you applied the stash or not, use the command git stash drop stash@{0} (the stash name). and to clear all the stash (delete all stash entries), use git stash clear. You have to be careful not to delete stashes that needed and aren’t applied yet.